Week 3
User Interface Design
- Due: July 17 (Wednesday) Quiz #4 on Blackboard
- Due: July 21 (Sunday) Week 3 Exercise । Getting Started with Figma
Congrats! You now know enough HTML and CSS to help you with a variety of tasks you might encounter in a future job. You can send newsletters, build basic pages, and can even create and edit posts in a Content Management System.
Our HTML/CSS half weeks taught us a lot about organizing and formatting information within a format that people can browse. We're now going to reinforce that idea when we think about other kinds of interactions people have with their computing devices.
Learning Resources
We're going to look at how interfaces can be designed to communicate both information and use.
From Designing Interfaces, 3rd Edition by Jenifer Tidwell, Charles Brewer, and Aynne Valencia
The material in these chapters will be familiar because they build on other readings you've done this semester. The chapters look long, but authors do a good job of providing a lot of examples and concrete advice. You're reading to get a general feeling of "best practices" (how things should work) and what to be on the lookout for when it comes time to design your own app.
- Chapter 1. Designing for People
- Chapter 2. Organizing the Content: Information Architecture and Application Structure
- Chapter 3. Getting Around: Navigation, Signposts, and Wayfinding
- Chapter 4. Layout of Screen Elements
Thinking With Wireframes
Wireframing is great! Think of it like storyboarding but for interfaces.
- How to wireframe with CharliMarieTV (YouTube, 14 min.)
- How To Succeed In Wireframe Design (Smashing Magazine, 17 min. read)
Once you've completed the readings, you'll be ready to take this week's quiz on Blackboard.
Unit 5 Exercise: Figma Wireframe
Learning Figma
- Sign up for Figma using your .ttu email and then click "Get Verified" to get a free student account
- Figma for mobile prototyping (Stream, 60 min.)
You will practice using Figma by re-creating four "frames" (screens) from an app you use regularly while using the Lo-Fi Wireframe Kit.
Keep in mind that a single "frame" in Figma can include multiple interactions such that tapping an icon to reveal a slide-out a menu (which is a frame within a frame). I'm looking for four distinct phone-sized frames, so these pop-ups wouldn't count toward your total. You will need at least one slide-in or pop-up interaction, so if your app doesn't include one, you can just pick a good place that one might be useful.
- 00:00 What is Figma?
- 02:26 Registering for Figma
- 03:50 After you log in
- 04:50 Kits and Components
- 05:10 The Basic Interface
- 06:30 Using "frames"
- 08:00 Lo-Fi Wireframe Kit
- 10:50 Lo-Fi Wireframe Components
- 12:15 Adding a New Page
- 13:35 Using a Device layout as a frame
- 15:55 Frame "flows" with "Prototype" interactions
- 20:00 Importing my screenshots
- 21:00 Replicating a layout
- 21:20 Navigation component
- 28:50 Card Layout
- 30:45 Aligning on the grid
- 35:00 Continuing to build
- 43:00 Adding a second frame
- 45:00 Frames within frames
- 45:50 "Auto Layout"
- 47:05 Using styles to modify components
- 50:25 Prototype interactions: "on tap"
- 50:50 Building an Overlay
- 56:17 Prototype interaction: "open overlay"
- 59:25 Wrapping Up
Optionally, if you want to know more about Figma you can check out Kevin Powell's Getting Started with Figma: A Beginner's Guide (YouTube, 43 min.)
Here's something like what I was working on in the video above: Wireframing
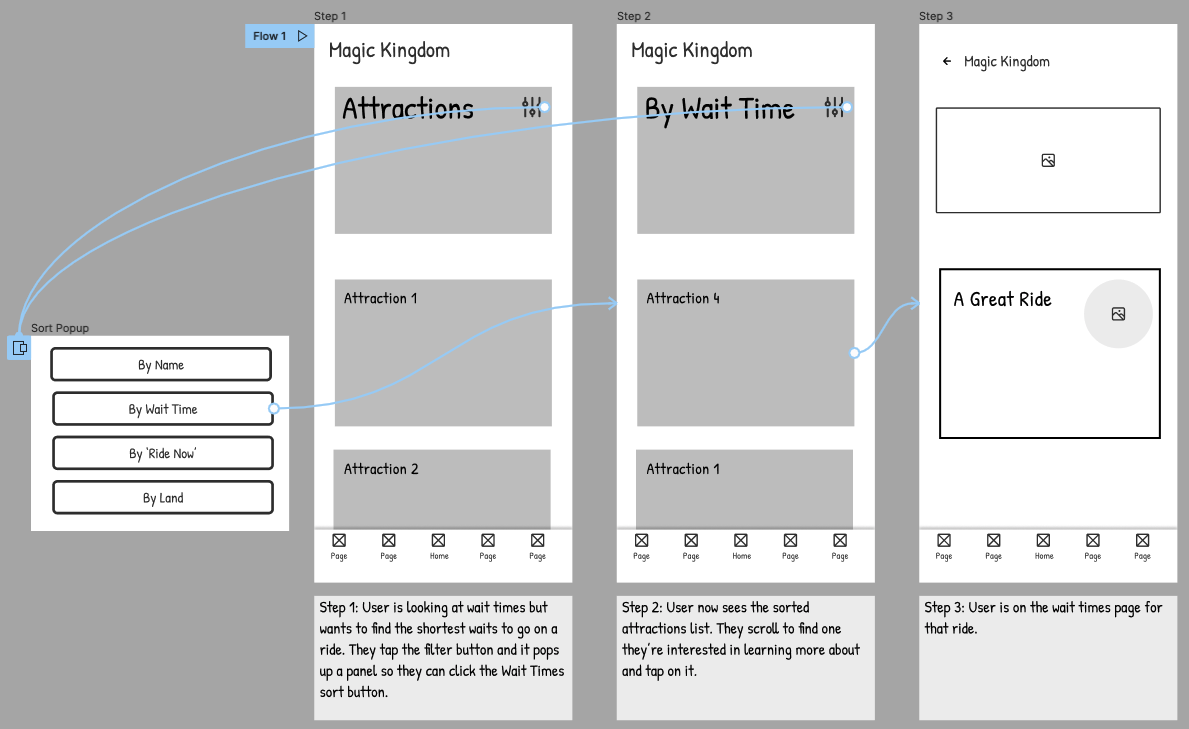
- Frame 1: Use the lo-fi components to wireframe the first screen the user sees. "what action will the user take to get to the next step of their task?" (Consider mobile interface verbs like tap, drag, pinch, etc.) User taps on sort button.
- Prototype Interaction: overlay frame slides into view with sort option buttons. User clicks 'By Wait Time'.
- Frame 2: What do they see now? What action do they want to take? User chooses a ride to view more info.
- Prototype Interaction: User taps to view additional information and taps again to move to the next screen.
- Frame 3: How is this screen organized? What information do you want to show them?
Week 3 Exercise | Steps
Choose an app from your phone that you'd like to replicate. Take screenshots of at least four different screens in the app and send them to your computer so you can upload them to your Design File. (Like I did with the Touring Plans app).
- Login to your Figma account and Duplicate the Lo-Fi Wireframe Kit
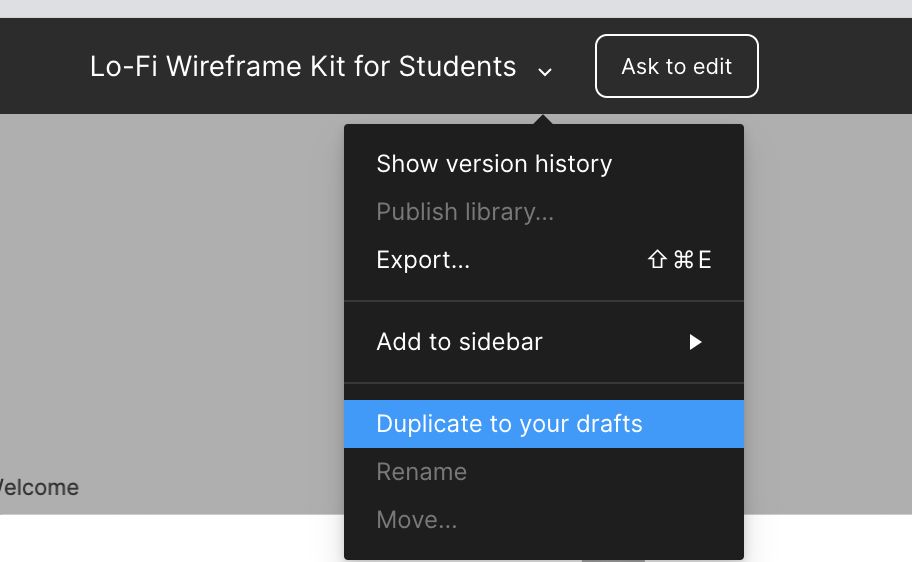
- Make sure to rename this duplicated project as your initials - exercise 3
- Create a new Page in this project and name it Practice App
- Navigated to the ❖ Components page and find the 15 Devices Right-click and copy the iPhone X Device component, go back to your Practice App Page and "paste here" onto the canvas.
- Right click the iPhone X component you just pasted and choose "Frame Selection" from the menu.
- You'll know it works if it's now called # Frame 2 in your browser.
- Lastly, click on the frame you just created and look to the Design pane on the right. Under the option for Layout Grid, press the + button. Then, press the icon that looks like nine dots. Set the "size" to 40. This will help you ensure your elements are aligned on a grid, as per the recommendations in Tidwell chapter 4.
(All of these instructions are in the video.)
- Import your screenshots into the Page you created and place them in order as your guides.
- After you create your four frames, wireframe their layouts and make them Interactive using the Prototype feature. (It can be as simple as "On Tap, Navigate to [next frame]")
- Include at least one pop-up or slide-in panel.
- As in my video example, be sure to annotate (write an explanation) below each frame with the Text tool.
- Preview and test your design using the Play ▷ button.
- Finally, when you're finished click the blue button and then Copy Link
Submit this link to Blackboard by Sunday July 21 at 11:59pm.